The Domain Name
System (DNS) is a hierarchical distributed naming system for
computers, services, or any resource connected to the Internet or a private
network. It associates various information with domain names assigned to each
of the participating entities.
Most importantly, it translates
domain names meaningful to humans into the numerical identifiers associated
with networking equipment for the purpose of locating and addressing these
devices worldwide.
However, most Windows
administrators still rely on the Windows Internet Name Service (WINS) for name
resolution on local area networks and some have little or no experience with
DNS. We’ll explain how to install, configure, and troubleshoot a Windows
Server 2008 DNS server.
Installation:
Step 1: Install a DNS
server from the Control Panel, follow these steps:
Go to
Start —> Control Panel —> Administrative Tools —> Server
Manager.
Expand
and click Roles
Click on Add Roles
Step 2: The new window
will open with the list of roles available to install. Select DNS server and
Click Next.
Step 3: Click next on the
introduction windows. In the last window click on install. It will start
installation, the following window shows the progress of installation.
Configuring DNS:
After installing DNS, you have to go Start —> All Programs —> Administrative Tools —> DNS for managing DNS server.
Whenever configuring your DNS server, you must be know about following concepts:
- Forward lookup zone
- Reverse lookup zone
- Zone types
A forward lookup zone is helps to resolve host names to IP addresses. A reverse lookup zone allows a DNS server to discover the DNS name of the host. Basically, it is the exact opposite of a forward lookup zone. A reverse lookup zone is not required, but it is easy to configure and will allow for your Windows Server 2008 Server to have full DNS functionality.
When selecting a DNS zone type, you have the following options: Active Directory (AD) Integrated, Standard Primary, and Standard Secondary. AD Integrated stores the database information in AD and allows for secure updates to the database file. This option will appear only if AD is configured. If it is configured and you select this option, AD will store and replicate your zone files.
A Standard Primary zone stores the database in a text file. This text file can be shared with other DNS servers that store their information in a text file. Finally, a Standard Secondary zone simply creates a copy of the existing database from another DNS server. This is primarily used for load balancing.
Step 1: Right Click on the name of the server in the DNS management console, Select on the Configure DNS server.
Step 2: Click on Create
forward and reverse lookup zone, then click next.
Step 3: Click on the Yes,
create the forward lookup zone now on the forward lookup zone window.
Step
4: Click on the desired zone that you want to create, in this case Primary Zone
Step 5: Type the Name of
the Zone and click Next.
Step 6: Click Next on the Zone File Name.
Step 7: Select the Allow both nonsecure and Secure dynamic updates and click Next to Continue.
Step 8: Select Yes, I want to create reverse lookup zone now, Click Next to continue.
Step 10: Select Primary Zone in Zone creating Window.
Step 11: Choose whether you want to create IPv4 or IPv6 reverse lookup zone.( in mycase IPv4 Reverse lookup zone)
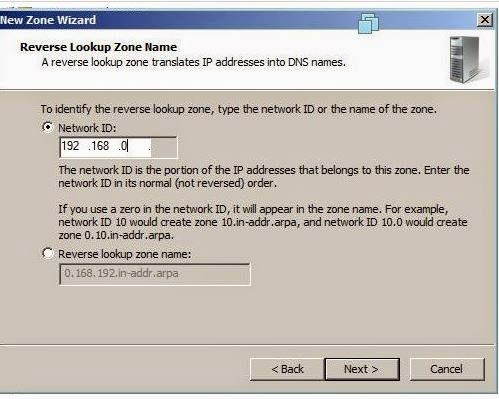
Step 12: Type you network
ID in the following window.
Step 13: Click next on the
Reverse lookup Zone file name window.
Step 14: Select the Allow
both non-secure and secure dynamic updates and click Next to Continue.
Step 15: Select No, i
should not forward queries, then click Next.
Step 16: Click finish on
the final window.


No comments:
Post a Comment